ON THIS WIKI
Land Mark
| Land Mark | |
|---|---|

| |
|
| |
| Name | Land Mark |
| Source Mod | BuildCraft |
| ID Name | BuildCraft|Builders:markerBlock
|
| Type | Block |
| Stackable | Yes (64) |
| Blast Resistance | 25.0 |
| Hardness | 0.0 |
| Solid | Yes |
| Transparent | No |
| Affected by Gravity | No |
| Emits Light | Yes (7) |
| Flammable | No |
| Required Tool | Any tool |
The Land Mark is an item from BuildCraft 3 used to mark out an area, usually as an indicator of the area for a Quarry, Architect Table, Filler, or Builder to work.
By placing down two or more Land Marks along the same axis and then right clicking on one of them, a red line will appear connecting them. This line is purely graphical and will penetrate through any blocks in its path. Placing a machine next to correctly activated Land Marks will cause all Land Marks to fall to the ground. Placing three Land Marks and right-clicking them, will auto complete the rectangle. See below.
Additionally, you can power a Land Mark with a Redstone signal to see blue guidelines of 63 blocks in length extending along the three Cartesian axes.
Land marks can be used to replicate builds from world to world with the help of architect table and builder. Cube areas for such builds can be expanded up to 256 blocks in all three directions 64 blocks at a time to encompass large builds. One use case is to download larger builds from elsewhere, mark them for architect table in single player world and replicating the build to survival multiplayer server.
Contents
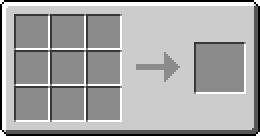
Recipe[edit]
Feed The Beast Infinity Evolved Expert Mode[edit]
Usage[edit]
Activated Mode[edit]
Land Marks are activated by right-clicking a Land Mark when a second Land Mark meets certain criteria. Activated Land Marks are used to define rectangles and cuboids for the Quarry, Filler, and Builder to operate in.
Requirements[edit]

The following criteria must be met in order for a beam to appear when right-clicking the Land Mark:
- The second Land Mark must be on the same Cartesian axis
- The second Land Mark must not be more than 63 blocks away from the connecting Land Mark
Rectangle[edit]

A rectangle can be created (e.g. for a Quarry) by defining three of the four corners of the rectangle in the same plane. The Land Marks will complete the rectangle when activated by right-clicking each Land Mark. To properly define an area with the Land Marks for a Quarry, the Quarry should be placed adjacent to an activated Land Mark. Otherwise, the Quarry will use its default size. Successful placement of a Quarry will result in the red beams being transformed into black and yellow striped beams, and the previously activated Land Marks will fall to the ground.
Box[edit]
A box can be created (e.g. for a Filler) by first creating a rectangle and placing a fourth Land Mark in the third axis to draw out another corner of the three dimensional box that will be filled. Right-clicking the "central" landmark will usually show lines outlining the whole box, however this doesn't always render correctly. When the filler is correctly placed adjacent to an activated Land Mark, the previously activated Land Marks will fall to the ground, and red and yellow striped beams will appear around the volume.
Guide Mode[edit]
By providing a Redstone signal to a single Land Mark (e.g. a Redstone Torch or Lever next to it), blue guidelines will appear extending along the three Cartesian axes from the Land Mark. These lines will be 63 blocks long and will pass through blocks. This can be used to help line up the next Land Mark or just to help visualize straight lines along an axis.

| ||||||||||||||||||||||||||||||||||||||||||||||||||||||||||||||
 Twitter Feed
Warning: file_get_contents(/srv/common/): failed to open stream: No such file or directory in /var/www/html/skins/MMWiki/SkinMMWiki.php on line 392
 Discussion

